Thursday, April 27, 2023

Near Parallel Data Loading using EPM Groovy REST API

Data Loading using EPMAutomate for a range of periods is always treated in sequential manner.  This in part due to how Data Management processes data between the staging and mapping tables under the covers, just look at the process log.  The Data Exchange framework offers some efficiencies and ways to speed up data loading.  Using EPMAutomate still processes 1 period at a time even Quick Mode.

In recent project when loading Forecast for 1 year it took 20 min using Quick Mode.

And we needed to load 3 years, and the forecast needed to be reloaded several times a day during the forecast cycle, so waiting nearly an hour was not an option.

As I pointed out in my blog post EPM Groovy RestAPI vs Groovy EPMAutomate for Data Loading REST APIs calling EPMAutomate uses POST and requires a GET to retrieve status.  

This presents an opportunity to think out of the box and after consultation with Joe Aultman the Evangelist of Groovy we decided that instead of sending a range in one EPMAutomate we would loop through the 12 periods and send POST to runIntegration for a period. And looking at the process details we saw 12 active integrations.

First (1) we need to create a List of the POST calls then iterate (2) through the list to GET the status of the runIntegration and once all 12 integrations finished the code proceeded to next step.


Using this approach we were able to cut the data load time down from 20 minutes per forecast year to less than 6 minutes per forecast year.


Friday, April 21, 2023

EPM Groovy RestAPI vs Groovy EPMAutomate for Data Loading

Lately I have been doing a lot more EPM Data Integration work.  I have been trying to move to more server side automation using Groovy in Business Rules to replace on-premises EPMAutomate scripts for most of my data loads.  

Here is link to documentation.

Before this was available, there was and still is the ability to call REST APIs to invoke actions within EPM.

Here is link to documentation.

One of the reasons I like using server side automation, is that it puts the responsibility of loading data back in the hands of the Business user. 

From a developer and development perspective Groovy and EPMAutomate I believe is easier and has less steep learning curve over Groovy and REST API. Additionally you can do same action with a lot less code using Groovy and EPMAutomate over REST API.

Here is example of running data integration with REST API.


One thing about REST API. There are 2 main commands used. POST sends action to request to remote server.  GET gets status or response of the POST.  So after you send POST you need another bit of code to check if the requested action of the POST has finished and if it was successful or was an error.  So you need a block of code like the following:


Now with EPMAutomate, it is different.  The framework behind the scenes has a wait, so all that is needed is to collect the status of the execution.


And by using a function logging is cleaner


Each approach has their merits and use cases, however with the introduction Groovy rules being able to run EPMAutomate commands the development time and lines of code are greatly reduced.


Monday, May 23, 2022

Oracle Analytics Cloud (OAC) Snapshot RestAPI - Part 4: Generate Bearer Token

In my first post in this series Oracle Analytics Cloud (OAC) Snapshot RestAPI - Part 1: Create Confidential Application (IDCS) I create the Confidential Application and collected the following:

  • Client ID
  • Client Secret
  • Scope URL

In order to create a Bearer Token you need to make the following curl call


However if you see in the 3rd line the Client ID and Client Secret need to be Base64 encoded.

The Client ID and Client Secret need to be concatenated with a colon (:) between them and then Base64 encoded. A handy online website will do it for you. Just copy out the encoded string and use in next step

https://www.base64encode.org/

The following curl command gets a bearer token that needs to be used all subsequent curl calls for Oracle Analytics Snapshots

Replace the designated areas with your information.


Copy the newly formulated block and paste into Postman
  1. Click Import
  2. Click Raw Text
  3. Paste curl command
  4. Click Continue

On next screen click Import

Postman will bring your curl command into the interface.  You can review the various tabs.

Click Send.  If everything was done correctly you should get a return in the response section with a long string.  This is your bearer token that will be used for future calls.


Since I want to do my RestAPI calls via PowerShell script I will have Postman provide me the script.

Click the button </>

 From the drop-down select PowerShell – RestMethod, copy the code snippet to clipboard.

In PowerShell editor paste the clipboard.

You will need to add -uri to the sting as shown in line 9

Run the new block of code and you should get a long string response just like in Postman


Since I will be using Postman to build the test the other curl commands and convert them the curl to PowerShell, I will save the Get Bearer Token tab.

I will be needing a Bearer Token for almost all the RestAPI calls so I made a function that Base64 encodes the Client ID & Secret and then does the RestAPI Call for the Bearer Token so that I can reuse within other scripts.


Oracle Analytics Cloud (OAC) Snapshot RestAPI - Part 3: Change Token Timeout for Analytics application

The Bear Token that gets generated for the Confidential Application that we created in Part 1: Create Confidential Application (IDCS) has a time out setting of 100 seconds.  This is fine for some simple actions but when working with Snapshots the sessions need to be open for a couple minutes.

The following are the steps I followed to increase the token timeout.
  1. Click  hamburger stack upper left corner 
  2. Click Oracle Cloud Services
  3. Click on Oracle Analytics instance ANALYTICSINST_<my_OAC_instance_ID>


  1. Go to Configuration tab
  2. Open Resources section
  3. Change Access Token Expiration to 600 (10 minutes)
  4. Click Save and acknowledge the change


Friday, April 29, 2022

Oracle Analytics Cloud (OAC) Snapshot RestAPI - Part 2: Create an OCI Storage Bucket

The RestAPI calls for creating an OACSnapshot requires an existing OCI Storage bucket for storing the snapshot.  The following are the steps I followed to create my storage bucket

From the Cloud Home page

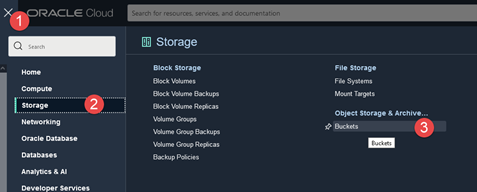
  1. Click hamburger stack in upper left corner
  2. From menu select Storage
  3. Below Object Storage & Archive Storage select Buckets


  1. Change to desired Compartment
  2. Click Create Bucket


Click on bucket name


Click Copy to get OCID and paste to Notepad for later


Below Objects create a Folder in Storage Bucket

  1. Click More Actions
  2. Select Create New Folder


Provide a name for the folder and click Create at bottom of the screen


The new folder is now in the Objects


I now have an OCI Storage Bucket for my OAC Snapshots.


Reference Documents

Object Versioning https://docs.cloud.oracle.com/en-us/iaas/Content/Object/Tasks/usingversioning.htm

Managing Objects https://docs.cloud.oracle.com/en-us/iaas/Content/Object/Tasks/managingobjects.htm