Tuesday, May 5, 2015

Creating A Geometry Theme

To create a Geometry Theme which will be used as a Layer in OBIEE work will be done in MapBuilder. 

This is broken into three parts:
  • Creating a Style
  • Creating a Geometry Theme
  • Modifying Geometry Theme

Creating a Style

A Geometry Theme can be created without a style, but the style helps with the display when brought into OBIEE.

The styles help highlight portions of a map.  Since this is a new map data source there are no styles.

 
The built in Help has a very informative section on Styles.
 

A review of the styles in the OBIEE Sample App v406 will show a variety of styles for the many maps.
 
 
These styles are maintained in the USER_SDO_STYLES view of the Oracle database that was identified in the Map Viewer datasource configuration.
 
For the Geometry Theme that will be used in OBIEE the only style that is needed is the Line to show the borders of the states.  If a State Name or Abbreviation is need to be displayed then Texts style will also be needed.  In this scenario a simple Black line will be used to show state borders. 
 
Connect to the MVDATA and then expand the upper structure.
 
Right Click on Lines and select Create Line Style.
 
 
In the New Line Style properties pane provide a name for the Style.  The standard naming convention for styles is to prefix the name with the first letter of the style.  I will also then indicate the color and thickness of the line.  The Description is optional but helpful.
 
 
 Finally the style needs to be saved so that it is written to the the database and available for use.
 
 
Now that a style is defined a Geometry theme can be created.
 
 
Creating a Geometry Theme
 
Click on the Show Data in the lower left of the screen and navigate to the Geometry data that was uploaded in Working with 3rd Party Shapefiles.  Right Click on the table and select Create Geometry Theme.
 

The Create Geometry Wizard will open.


Step 1: Provide a Name for the Theme.  Note do not use spaces in the name.

 
Step 2: Apply a Style that was created earlier
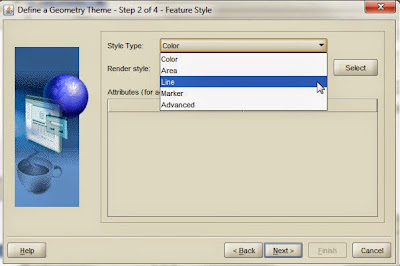
 
 
Step 3: If a label is needed then apply the Text Style and the attribute associated with the Geometry that will be displayed. This option can be added to the Theme later if necessary.

 
Step 4: Apply a query condition to the Geometry table.  For example if the Geometry data for the United States included the Territory of Puerto Rico and it needed to be excluded from the Geometry Theme the condition would contain NAME <> 'Puerto Rico'.  For this example it will remain blank.  This option can be added to the Theme later if necessary.

 
A final review of the Theme is presented.  Click Finish.
 
 
Once created the Theme will appear in the list and the Properties panel will be visible.

 
The Style Rules panel can be updated as per needs.

 
The Advanced panel is what will be updated so as to provide link to OBIEE data.

 
To View the map click on the Preview tab at bottom of screen and click the Green Play button on the preview panel.


Use the Pan/Zoom and Identify buttons just as when previewing the Geometry table that was uploaded from the shapefile.


Modifying a Geometry Theme 
 
The Advanced Tab allows for creating linkage between Geometry Theme and OBIEE.  The RowID is the current Key Column which denotes a unique row in the theme.  This can be updated to any attribute column in the data and I will often set it to the State FIPS code (STATEFP) or the GEOID column.
 

At this point is helpful to know the data within OBIEE.  Use the using the Identify tool in the preview panel to review the Theme Attributes. A common link is on State Abbreviation or State Name.  Also note that case matters when joining data.
 
 
To add Info Columns that will be used to join to OBIEE data Click the small pencil in the lower left corner of the Advanced panel.
 
In the Edit Info Columns click the Add button
 

Select the columns and provide appropriate names.  Note do not use spaces in the Name column.


The Advanced panel will now have the 2 new Info Columns.

 
Save the modifications.
 
Now we are ready to bring the Geometry Theme into OBIEE and use in a Map View.  That is the topic of a different post.


Monday, April 27, 2015

OBIEE & Essbase Substitution Variables

In one of my first blog post I indicated that I may deviate from my primary topic to write about other topics that may get my attention.

This topic is one that has taken my attention away from my recent series of past posts on the topic of Maps with OBIEE.

When working with OBIEE and relational databases it is common for a Connection Pool to be dedicated for repository variables.  In fact there is an option that RPD Developers will set so that the Connection Pool for used for Initialization Blocks that populate the repository variabes is different than the Connection Pool for the data.  This serves a few purposes, foremost is that the user ID for the Initialization Blocks and Repository Variables can be set so that it is purely used for this administrative data.


When working with Essbase as a data source I have found that it is more convenient to have a completely separate "database" in the physical layer to support Repository Variables and more specifically Essbase Substitution Variables.


Depending on the scope of the Essbase variable, the naming convention for the BI Server variable is as described below.
Server instance scope
<server name>:<var name>
Application scope
<server name>:<app name>:<var name>
Cube scope
<server name>:<app name>:<cube name>:<var name>


So that my RPD is not specifically tied to an environment and Essbase Server Name I will rename the "database server" and connection pool to a more business purpose name.  Also note that since this imported database will solely be used for Substitution Variables set the name so that there are no spaces in the name.

Finally the initialization block and variable information will need to be updated to match the new name of the "database".  This removes environment issues when migrating Dev > Test > Prod.


If there are Application or Cube level substitution variables then import that cube into this "database". 


For the cube(s) that will be used for OBI Analysis; they should be imported into a separate "database" in the Physical Layer.  There will need to be some clean up in the variable manager, delete any repository variables and initialization blocks that are created for those cubes that are used in OBI Analysis.


Monday, April 13, 2015

Working with 3rd Party Shapefiles

The past few posts may have seemed rather fundamental, however if these basic tasks are not done it is impossible to be successful in deploying maps within OBIEE.

When I've done OBIEE and Spatial Analytic presentations at conferences I am often asked where can one get more maps.  I covered online sources for map shapefiles in this previous post.

With MapBuilder you now have 2 options for using map shapefiles.  The original and my preferred use is to import shapefiles into the Oracle database as a table with geometry data and build necessary themes from that base table.  In version 11 of MapBuilder many enhancements were add and most notably with regard to ShapeFiles is Custom Geometry Themes.  I will leave you to the documentation to explore this option or wait until I write up a blog post on it.


Importing Shapefiles

The shapefile used in the following example was downloaded from U.S. Census Bureau.
 
http://www.census.gov/geo/maps-data/data/tiger.html
 
As indicated in the shapefile post the Cartographic Boundary Shapefiles will be sufficient.
 
 
The next option is the map scale and for OBIEE maps.  The 20m = 1:20,000,000 resolution level will be fine. 
 
 
Download and save to a location on your computer and extract the .zip file.

 
You can look at the metadata that is included with the map by opening the .dbf file with Excel.
 
 
Note that this data file contains administrative boundary information for the 50 states and the District of Columbia and Puerto Rico.
 
Looking though the data we need to find column(s) that contain unique data.  This is important when linking to OBIEE tabular data. 
 
The key columns in this data set that we can work with are:
  • STATEFP - State FIPS
  • GEOID
  • STUPS (abbreviation)
  • NAME

As a note when working with US County data the State and County FIPS or a composite County - State Abbreviation will be needed since a County Name is not unique.
 
Now that the shapefile has been extracted it needs to be uploaded into the mvdata schema on the Oracle Database.
 
Launch MapBuilder and load the connection to the mvdata schema.

From top menu select Tools > Import Shapefile


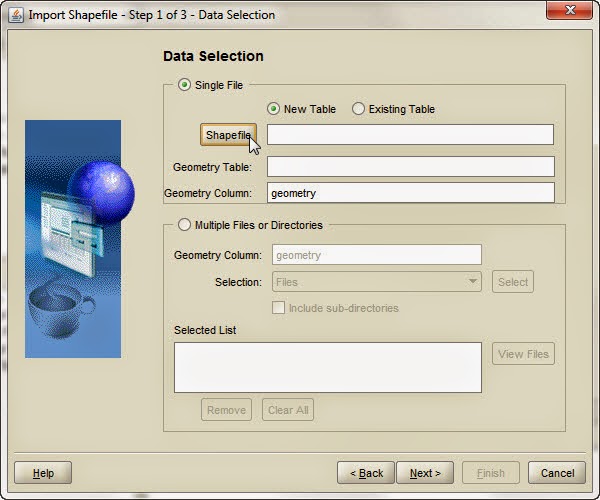
Step 1 of the Import Shapefile is the Data Selection dialog.

Keep the option set to Single FIle and Click the Shapefile button

An open file dialog window will appear. Navigate to your saved and extracted Shapefiles and Select the .shp file

The Geometry table name is auto populated based on file name it can be changed, just be aware of database naming requirements.  Click Next

Set the SRID.  This is set from the .prj file within the Shapefile collection.  Keep the checkbox for Create/Update spatial index checked.  Click Next

A theme can be automatically created upon import.  For the sake of this exercise it will be skipped and saved for later example.  Click Next

Review the activities to be executed.  Click Finish

An import status window will display

Once the import is complete click the Refresh button to reload MapBuilder

In Lower left corner click the Show Data toggle and Expand the Spatial Tables and Geometry Tables.

Find the imported table.  Right click and select Preview

On the right side of the toolbar there is a green arrow to start the query to preview the map


The icons in upper left of toolbar allow for zoom and pan. 

Zoom in on the Map to get a better view.

The Identify tool in the Preview control allows you to see the attribute data that accompanies the map.
Now that there is a spatial data loaded to our MVDATA schema we are ready to create a Map Theme that we can use as a Map Layer in OBIEE, but that is the topic for another post.


Tuesday, April 7, 2015

Map Builder


This post will focus on MapBuilder.

For map views to be used within an OBI Analysis there needs to be some basic backend components set up.

MapBuilder helps with this by creating and managing the Map Metadata.

Download the MapBuilder tool from here - for these blog posts I will be working with the 11.x version.

The one thing I found confusing when I first started working with Map Views was aligning objects in one tool with objects in another tool.  As quick refernce this picture shows objects in MapBuilder that align to OBIEE Map Data Management.


Definition of the objects within MapBuilder:
Theme
Collection of geometries and includes information for visually representing a layer (default formats, labels)
The tables defining shapes (geometry columns) are assumed to be in the Oracle DB

Basemap
Logical collection of themes with associated scale and order
Mapviewer engine generates tile images based on the basemap definition

Tile Layer
An instance of basemap presented as image by the Mapviewer engine


When working with MapBuilder the tool is making entries into the following views.

USER_SDO_MAPS – Stores definitions of base maps

USER_SDO_THEMES – stores definitions of individual map layers or themes

USER_SDO_STYLES – stores individual map symbols and other types of styles such as LINE patterns, COLOR definitions and thematic mapping styles

USER_SDO_CACHED_MAPS – Stores maps in Tiles for faster retrieval

Launch the mapbuilder.jar from the downloaded file.  MapBuilder opens to the following view. Click the Connection control to create a connection to the MVDATA schema that was created in the previous post.


Click the Add button


Provide your connection information for the MVDATA Schema


Test the connection


Click Load to connect and return to main screen


Expand Tile Layers and you will see the Oracle Elocation_Map layer we added in our MapViewer post.


We now have MapBuilder configured.  In the next post we will look at loading Shapefiles into our Database as a Geometry table that we will then use to make a Map Theme that we can use in OBIEE as a Map Layer.